
Table of Contents
ToggleLiar’s Retreat is one of Skyrim’s most overlooked dungeons, tucked away in the Reach with a story that unfolds through environmental storytelling. Unlike most bandit hideouts, this cave offers more than mindless sword-swinging, it’s a three-way conflict zone where bandits, Falmer, and spiders clash in the darkness. The reward for clearing it? The Longhammer, one of the fastest two-handed weapons in the game, plus decent loot for mid-level players.
Most players stumble across Liar’s Retreat while exploring the western mountains or following the road between Solitude and Markarth. It’s easy to miss if you’re not paying attention, but worth the detour for the unique weapon alone. This guide covers everything: exact location, enemy breakdowns, room-by-room walkthrough, loot locations, and tips to avoid the common pitfalls that get players killed.
Key Takeaways
- Liar’s Retreat is located in the Reach northwest of Karthwasten, accessible from major cities like Solitude and Markarth, featuring a three-way conflict between bandits, Falmer, and spiders that creates unique combat opportunities.
- The Longhammer, a unique two-handed warhammer with 30% faster swing speed than standard warhammers, is the primary reward and becomes exceptionally powerful when paired with the Elemental Fury shout for late-game viability.
- Players between level 10-15 can comfortably clear the dungeon by letting bandits and Falmer fight each other before engaging survivors, using stealth and destruction magic to thin enemy numbers efficiently.
- The dungeon’s environmental storytelling reveals how Falmer tunneled from below to overrun a bandit hideout, evidenced by dead bandits with Falmer arrows throughout the progressively deeper chambers.
- Beyond The Longhammer, additional loot includes a Pickpocket skill book, a master-locked chest with leveled enchanted gear, roughly 300-500 gold, and valuable alchemy ingredients scattered throughout.
- Common fatal mistakes include rushing past the Longhammer in the final chamber, ignoring pressure plate traps (especially the lethal spike wall), and fighting all enemies at once instead of exploiting the bandit-Falmer conflict for tactical advantage.
Where to Find Liar’s Retreat in Skyrim
Liar’s Retreat sits in the Reach, northwest of Karthwasten and northeast of Broken Tower Redoubt. The cave entrance faces south, carved into the mountainside along the northern bank of the Karth River. If you’re following the river west from Dragon Bridge or east from the Reach, you’ll pass directly by it.
The location marker doesn’t appear on your map until you get close, so keep an eye on your compass. You’ll spot the cave entrance marked with the standard dungeon icon. There’s no quest that automatically directs you here, it’s purely a discoverable location.
Navigating to Liar’s Retreat from Major Cities
From Solitude, head southwest along the main road toward Dragon Bridge, then follow the Karth River west. The journey takes about 10-15 minutes on foot, longer if you run into wolves or bandits along the way.
From Markarth, travel northeast past Karthwasten. Stick to the northern edge of the mountains rather than cutting through Blind Cliff Cave territory. The trek is shorter than from Solitude but involves more elevation changes.
From Whiterun, your best bet is fast-traveling to Dragon Bridge if you’ve discovered it, then following the river. Otherwise, you’re looking at a long trek through the Reach, doable, but inefficient.
Fast travel to Karthwasten or Left Hand Mine puts you closest to Liar’s Retreat if you’ve unlocked those locations. From Karthwasten, head directly northwest and you’ll hit the river, then follow it east briefly.
What to Expect: Enemies and Challenges Inside Liar’s Retreat
Liar’s Retreat isn’t your standard bandit cave. The dungeon tells a story through combat encounters, bandits are getting overrun by Falmer pushing up from the lower tunnels. You’ll find dead bandits scattered throughout, some killed by Falmer, others by traps they likely set themselves.
Enemy composition shifts as you progress deeper. The entrance and first few chambers are bandit territory. Mid-level bandits with standard gear, fur armor, iron or steel weapons, maybe a few archers. Nothing special. The deeper tunnels introduce Falmer and their pet Frostbite Spiders, and by the final chamber, the bandits are completely wiped out.
Bandits vs. Falmer: Understanding the Power Struggle
The environmental storytelling here is solid. Bandits clearly occupied this cave as a hideout (hence the name), but Falmer tunneled up from Blackreach-connected caverns below. You’ll walk through scenes of recent combat, dead bandits with Falmer arrows, overturned furniture, blood trails.
Smart players can exploit this. Let enemies fight each other before you engage. In several chambers, bandits and Falmer are actively hostile to each other. Hang back, let them thin the numbers, then clean up whoever survives. This is especially useful if you’re underleveled or playing on higher difficulties.
Falmer hit harder than bandits and can poison you with their arrows. They’re also tougher to detect if you’re sneaking, they rely on sound, so moving slowly works, but any noise alerts them instantly. Frostbite Spiders are fragile but their poison slows you down. Focus fire on spiders first in mixed groups.
Recommended Character Level and Combat Strategies
Level 10-15 is comfortable for most builds. Below that, Falmer can overwhelm you quickly, especially if you’re not familiar with their aggro patterns. Above level 20, Liar’s Retreat becomes trivial unless you’re playing on Legendary difficulty.
Melee builds: Standard sword-and-board or two-handed works fine. Keep stamina potions handy for power attacks against Falmer. Their armor isn’t heavy, but they dodge frequently.
Stealth builds: Excellent dungeon for archery or daggers. Lots of shadows, narrow corridors for backstabs, and enemies often face away from you. One-shot potential with sneak attacks is high here, even at mid-level Sneak skill. Many players find stealth builds particularly effective in Falmer-heavy dungeons due to their reliance on sound detection.
Magic builds: Destruction mages have it easy, Falmer are weak to fire. Flames or Fireball clear rooms fast. Conjuration is also strong: summon a Flame Atronach and let it draw aggro while you pick off stragglers.
Bring healing potions regardless. There’s no friendly NPCs here, no safe corners to wait for health regen mid-fight.
Step-by-Step Walkthrough of Liar’s Retreat
Liar’s Retreat is linear with minimal branching paths. Follow the main tunnel, clear rooms as you go, loot everything. Total clear time is 20-30 minutes depending on your playstyle.
The Entrance and First Chambers
Enter the cave and immediately head down a short slope. The first chamber has two bandits around a campfire on the left. They’re usually facing the fire, easy sneak attack targets. One archer patrols the upper ledge on the right, take him out first or he’ll pincushion you while you’re fighting below.
Loot the bedrolls and chests here. Nothing amazing, but early-game players will appreciate the gold and minor gear. A copy of the Pickpocket skill book (Purloined Shadows) sits on a table near the campfire, grab it for the free skill point.
Continue deeper. The tunnel narrows and you’ll pass a pressure plate trap connected to a swinging mace. Easy to spot if you’re watching the floor. Disarm it or just walk around.
The second chamber has three more bandits, including a Bandit Chief if you’re higher level. This is the last purely bandit-controlled room. After this, you start seeing Falmer.
Navigating the Middle Tunnels and Traps
Past the second chamber, the cave splits briefly. Both paths rejoin, but the left path has a bear trap and the right has a Falmer patrolling. Take the right path, sneak up on the Falmer, drop it before it alerts others.
You’ll enter a larger cavern with a small underground stream. Two Falmer and one Frostbite Spider patrol here. There’s also a dead bandit near the water, his body has a decent amount of gold and a leveled weapon. This is where the bandit-Falmer war becomes obvious. You’ll see more dead bandits with Falmer arrows as you progress.
The tunnel continues upward slightly. Watch for another pressure plate, this one triggers a spike wall. It’s lethal if you’re sprinting and not paying attention. If you’re leading a follower, they might trigger it. Save before this section if you’re using a follower you care about.
Next chamber has two Falmer archers on an elevated platform and one Falmer melee at ground level. Rush the melee guy first, then deal with the archers. They’re positioned well to wreck you if you let them kite.
The Final Chamber and Boss Encounter
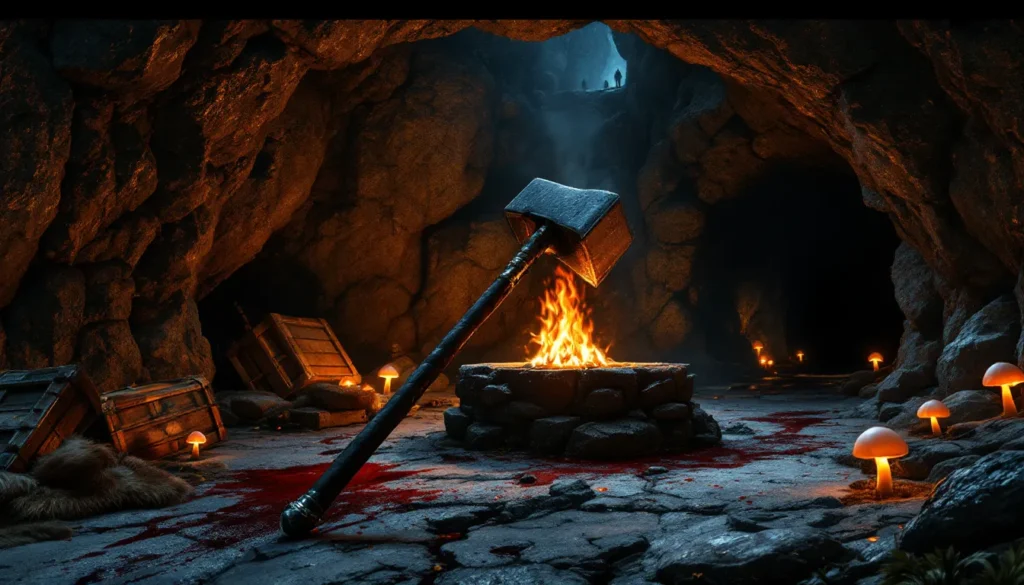
The final chamber is the largest room in the dungeon. Central area has three Falmer including a Falmer Shadowmaster (boss variant) if you’re level 22+. Otherwise, it’s a standard Falmer Gloomlurker or Skulker. Two Frostbite Spiders drop from the ceiling when you enter, annoying but manageable.
The Longhammer is here, leaning against a forge on the right side of the room. You can’t miss it. It’s a unique warhammer with faster swing speed than any other two-handed weapon. Grab it immediately if that’s what you came for.
Clear the Falmer, then loot the room thoroughly. There’s a master-locked chest behind the forge with leveled loot, lockpicks or Lockpicking skill required. An alchemy table sits in the corner with ingredients worth collecting if you’re into crafting.
An alternate exit tunnel leads back toward the entrance, spitting you out near the second chamber. Useful if you’re overencumbered and need to backtrack without fighting respawned enemies (though enemies don’t respawn for 10-30 in-game days depending on cell type).
Unique Loot and Rewards at Liar’s Retreat
Liar’s Retreat’s main draw is The Longhammer, but there’s other loot worth grabbing if you’re thorough.
The Longhammer: Stats and Why It’s Worth Claiming
The Longhammer is a unique warhammer with the following stats:
- Base Damage: 21 (same as a standard warhammer)
- Weight: 18
- Value: 26 gold
- Speed: 0.6 (30% faster than standard warhammers at 0.8)
The speed boost is the key. Warhammers are the slowest weapon class in Skyrim, making them impractical against fast enemies or in group fights. The Longhammer swings as fast as a battleaxe, giving you the damage output of a warhammer with better DPS and less vulnerability between swings.
It’s especially strong for power attack builds using the Elemental Fury shout. Elemental Fury doesn’t work on enchanted weapons, and The Longhammer is unenchanted, so you can stack the speed buff. With Elemental Fury rank 3, The Longhammer becomes a blur, absurd DPS for a two-handed weapon.
The weapon scales with Smithing improvements. At Legendary quality with relevant perks, it hits harder than most unique weapons of its class. It’s viable well into late-game if you’re committed to two-handed builds.
Other Valuable Items and Skill Books
Beyond The Longhammer:
- Pickpocket skill book (Purloined Shadows) in the first chamber near the campfire.
- Leveled enchanted weapon on the Falmer boss in the final chamber.
- Master-locked chest behind the forge with gold, gems, and leveled equipment.
- Alchemy ingredients: Falmer Ears, Frostbite Venom, Glowing Mushrooms scattered throughout the cave.
- Gold and gems: Roughly 300-500 gold total if you loot every body and container.
Nothing game-changing besides The Longhammer, but solid haul for a mid-level dungeon. Players following detailed walkthrough strategies often cite Liar’s Retreat as one of the better risk-to-reward dungeons in the Reach.
Associated Quests and Lore Connections
Liar’s Retreat has no associated radiant or story quests. It’s a standalone location with its own self-contained narrative told through environmental design.
That said, the Thieves Guild radiant quest “Larceny Targets” can occasionally send you here to steal a specific item. It’s rare, but possible. If you’ve already cleared the dungeon, the quest becomes trivial, just walk in and grab the item.
The Tragically Slain Adventurers: Uncovering the Story
The dungeon’s story is simple but effective. A bandit gang occupied the cave, using it as a hideout (the “retreat” in the name). They didn’t realize Falmer were tunneling up from below. By the time you arrive, the Falmer have pushed through and slaughtered most of the bandits.
You can piece this together from the bodies. Early chambers have live bandits, middle sections have dead bandits with Falmer arrows, and the final chamber is pure Falmer territory with no living bandits. The forge and alchemy table suggest the bandits were settling in for long-term occupation, bad timing.
One dead bandit near the entrance carries a note mentioning the gang’s leader and their plan to lay low after a big score. It’s flavor text, no quest tie-in, but adds depth. Typical Bethesda environmental storytelling, minimalist but effective.
Some players speculate the “Liar’s Retreat” name refers to a specific bandit leader known for deception, but there’s no in-game evidence. More likely it’s just a bandit gang operating under that moniker.
Tips for Efficient Looting and Exploration
Liar’s Retreat is straightforward, but here’s how to optimize your run:
Bring a follower with high carry capacity. Lydia or any tank-type follower works. The dungeon has decent loot density, and you’ll hit your carry limit if you’re looting everything. Alternatively, use the Steed Stone standing stone for +100 carry weight and no movement penalty from armor.
Save before the final chamber. The Falmer boss can surprise you if you’re underleveled, and the spiders dropping from the ceiling are easy to miss. Quick save lets you retry without losing progress.
Use Detect Life or Detect Dead spells if you have them. Falmer are hard to spot in dark tunnels, and Detect Life highlights them through walls. Detect Dead helps you find corpses with loot in shadowy corners.
Don’t skip the alchemy table. If you’re an alchemy build, you can craft potion of restore health or stamina on-site using ingredients from the dungeon. Free consumables before the boss fight.
Fast travel out after clearing. The alternate exit loop is convenient, but fast travel from the final chamber saves more time. Just make sure you’re not overencumbered.
If you’re modding your game, popular mods on community platforms sometimes enhance Liar’s Retreat with additional enemies or improved loot tables. Vanilla version is balanced for mid-level characters, but mods can scale it up for endgame players looking for a challenge.
Common Mistakes to Avoid at Liar’s Retreat
Rushing through and missing The Longhammer. It’s easy to clear the final chamber, grab some random loot, and leave without noticing the warhammer leaning against the forge. It doesn’t glow or stand out visually. Make a conscious effort to check the forge area.
Ignoring the pressure plate traps. Most traps in Skyrim are telegraphed and easy to avoid, but if you’re sprinting or not watching the ground, the spike wall trap will wreck you. Followers are especially prone to triggering it.
Fighting all enemies at once in the middle tunnels. The cavern with the stream has multiple Falmer and spiders that can gang up on you. Pull them one at a time with arrows or spells. Don’t charge in and aggro the entire room.
Leaving without checking the master-locked chest. If your Lockpicking is low, bring lockpicks. The chest has the best leveled loot in the dungeon aside from The Longhammer. Skipping it means missing out on potential enchanted gear or valuable gems.
Not letting bandits and Falmer fight each other. Several chambers have both enemy types in proximity. Sneak past the initial aggro range, let them engage each other, then clean up. Saves health potions and makes the dungeon easier overall.
Underestimating Falmer poison. Falmer arrows inflict poison damage over time. If you’re hit by multiple archers, the poison stacks and can drop you fast. Carry Cure Poison potions or have high poison resistance gear if you’re struggling.
Conclusion
Liar’s Retreat delivers exactly what it promises: a compact dungeon with a clear reward and minimal filler. The Longhammer alone justifies the trip for two-handed builds, and the environmental storytelling adds just enough flavor to keep the crawl interesting. It’s not the longest or most complex dungeon in Skyrim, but it’s well-paced and respects your time.
For players around level 10-15, this is one of the better detours in the Reach. You get combat variety, a unique weapon, and some solid loot without the tedious sprawl of larger dungeons. Clear it once, grab The Longhammer, and move on, or revisit after 30 in-game days when enemies respawn if you need more Falmer Ears for alchemy.
If you’re building a character around fast two-handed weapons or just want to experience one of Skyrim’s lesser-known locations, Liar’s Retreat is worth the trek.


